Need a Korean Dessert? Try this Easy Baked Yakgwa!
When it comes to Korean desserts, sadly, there are very few that you can make at home without a lot of fuss.
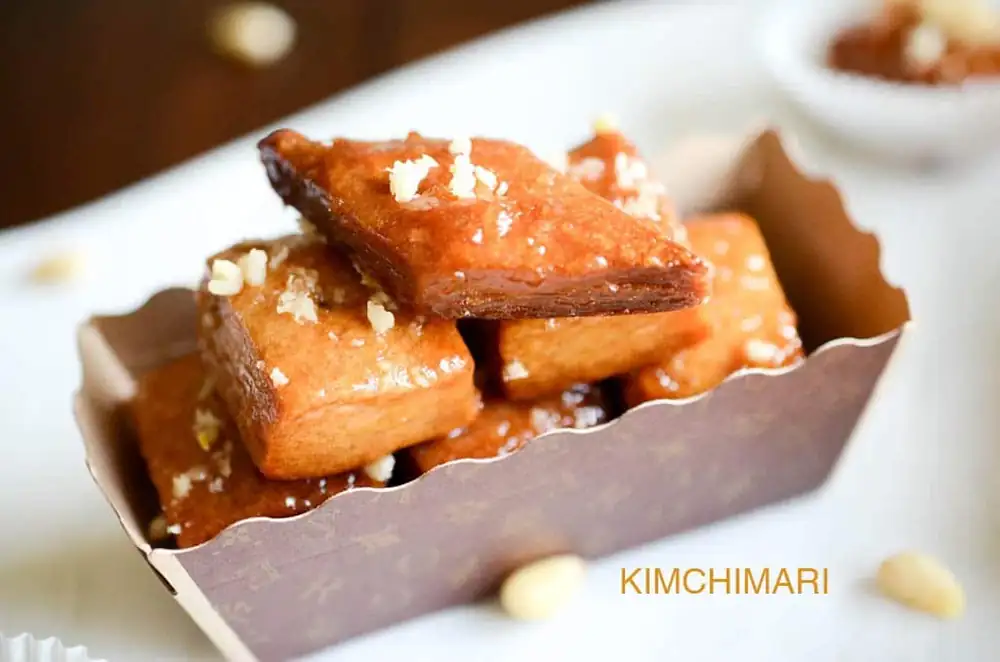
- 2 1/4 cup medium protein flour or pastry flour ((all purpose is OK))
- 1/4 cup sesame oil
- 1/4 cup soju
- 1/4 cup honey
- 1/8 tsp salt
- 1 tsp baking powder
- 1/4 tsp baking soda
- 2 Tbsp melted butter or vegetable oil ((for brushing the top))
- 2 Tbsp chopped pine nuts ((as topping))
- 1 cup rice syrup ((jochung 조청 – if not available, you can substitute honey))
- 1 cup honey
- 2 cup water
- 1 Tbsp grated fresh ginger ((more if you like ginger))
- Preheat oven to 250°F.
- In a bowl, mix all dry ingredients: flour, salt, baking powder and baking soda.
- Add sesame oil to flour mixture. Mix with your hands by rubbing the oil flour mixture until oil is evenly distributed.
- Separately mix soju and honey. For pictures of steps 1 -4, refer to my original Yakwa post since this part is identical.
- Add soju honey mixture to flour. Gather pastry into a ball. (Do not overwork the dough otherwise it will become tough). This should feel and look like pie crust dough except it is less fatty.
- Divide the dough in half. Roll out one half of the dough into 1/4 to 1/3 inch thick rectangular shape about 1 inch x 1 inch. Rolling the dough too thick will make the baked Yakwa too hard. Cut the dough into 1 inch wide strips and then cut the strips at an angle to make diamond shapes or straight to make squares. It’s up to you.
- Pierce holes in the center using a chopstick or a fork.
- Lay out the Yakwa squares onto a pan.
- Brush the top of each Yakwa piece generously with butter.
- Bake at 250°F (125°C) for 15 minutes.
- While Yakwa is baking, make the syrup by mixing the rice syrup, honey and water in a sauce pan or frying pan. Heat on medium heat, stirring occasionally. Once it boils, turn the heat off and add the chopped ginger, mix and set it aside.
- Chop a handful of pine nuts and that should yield about 2 Tbs.
- Raise heat to 300°F (150°C) and cook for another 10 minutes.
- Finally, raise temperature to 350°F (175°C) and cook for about 7-8 minutes depending on how thin your Yakwa is.
- When Yakwa is nicely browned, take out of the oven and immediately add it to the syrup.
- Let it sit in syrup for at least 30 minutes or for an hour or more. You can even leave it in syrup overnight. The longer they sit in syrup, the more it will absorb and will get softer. Unlike the fried yakwa where you only need to soak for couple minutes, baked yakwa needs to soak in syrup longer.
- Let it sit in syrup for at least 30 minutes or for an hour or more. You can even leave it in syrup overnight. The longer they sit in syrup, the more it will absorb and will get softer. Unlike the fried yakwa where you only need to soak for couple minutes, baked yakwa needs to soak in syrup longer.
- Take Yakwa out from the syrup when it is to your liking and sprinkle with chopped pine nuts.
So I was extra excited when I heard that there was a new baked version of Yakwa/Yagkwa – the Korean dessert that is traditionally fried and coated in ginger honey syrup. I always thought that it would be a very interesting recipe to explore but somehow I never got around to it until now.
Frankly, I think I had this underlying doubt that this baked Korean dessert was probably going to be nowhere near as good as my original fried Yakwa-or Yakgwa, or its crumblier and softer counterpart— Chapssal Yakgwa. There’s also a fun story I have about the history of this Korean dessert and more – read my Story of two Korean sweets.
To be honest, the original fried Yakgwa version is quite labor intensive and is virtually impossible to make on your own unless you are ambidextrous or have 4 hands and was also able to handle two separate tasks of frying and dipping all simulateneously! 🙂 So I said, if I could find a baked version that was almost as good as the fried Yakgwa, I would be so happy because then I would have a go-to Korean dessert to serve at my dinner parties or to bring to a potluck.
Now, I said “easy” on the title but coming up with the right recipe for this decadent Korean dessert was not at all an “easy” task for me. After many trials and using my husband (remember he grew up with my mother-in-law’s famous Yakgwa) as the taste guinea pig all this week, I think I’m happy with the result. It is not exactly what I was hoping for but we decided this recipe tastes good in its own, special way.
Since it’s baked, it is drier but crispier, less rich but also lighter in taste. In terms of calories, this baked Yakwa recipe is a healthier and lighter version and in terms of cooking and cleanup, it is – oh, oh, so much easier.
Talking about clean up… ahh…OK, you can feel.. a story coming up, right?? Yes.
Here it is. While in Korea, around Chuseok, my sister #3 and I started a Yakgwa business for a short while. People who bought it loved it and we got more orders but my sister and I had too many other things going on (like my cooking classes) and we also realized that we made no money making Yakwa so we decided to close shop after that season. 🙂 But I nailed my Yakgwa-making skills down to a science because of it!
Anyway, after we were all done, I ended up with about 9 liters (2.4 gallons) of used frying oil!! The problem was that I didn’t know how to dispose of it – I knew I couldn’t just pour it down the sink…So I saved it in bottles until many months passed and it was time for us to leave Korea.
I asked around about what to do with the used oil and someone told me that you could make soap from used cooking oil!! Wow!
What a fantastic idea! 😃 So after first confessing to my husband 😜 that I had hidden over 2 gallons of oil, I told him that I needed his help in making it into soap otherwise the oil would have to go with us to the US!!!
hahaha.. just kidding…Yeobo! 😘 (FYI – Yeobo (여보) = honey/darling in Korean) Well, after hearing my husband’s grumbling and lamenting about how he ended up with a wife who just doesn’t stay still and always creates extra work, he started researching feverishly about how to make soap at home with used frying oil.
Because he was not working at that time, I knew he had the time to do it but I had no idea he would get so deeply into it – which was a total surprise to me. I mean this is a man who only knows how to make ramen, curry rice, and coffee.
He is great at washing dishes but has no interest in cooking or anything crafty. But, funny thing, I saw that he was totally in his science geek mode (he is an Electrical Engineer), calculating the amounts and why this would work or not work.
He calculated and recalculated for 2 days before he settled on a recipe. So long story short, imagine my husband and I, two science PhDs, looking down at the bucket of oil and caustic soda, trying to figure out how to make soap from the recipe (because it was not working well); arguing with each other one moment – when it wasn’t working and then so excited the next moment – when we finally got it to harden into soap!! But wait, that’s not all…so it turns out we ended up adding too much caustic soda and when my husband washed his hands with the soap he said it hurt his hands!
Yikes!! Oh, dear…
So, we let it sit for weeks and then gave it to my mother-in-law. And she told me that it makes the best laundry soap, so it was all good!
Right, let’s get back to baking some yummy Yakwa. I ended up with 2 different versions: one that is quite crispy and another one that is softer and crumblier. I will introduce the crispy one here.
Will do another post next about the crispy version.
Easy Baked Korean Dessert – Yakwa
Servings: 60-70 pieces (1-inch squares) Time: Prep 25 min + cook 33 min Difficulty: Medium
Step-by-Step Directions
- Add sesame oil to the flour mixture. Mix with your hands by rubbing the oil-flour mixture until the oil is evenly distributed.
- Separately mix soju and honey. For pictures of steps 1 -4, refer to my original Yakgwa post since this part is identical.
- Add Soju honey mixture to flour. Gather pastry into a ball. (Do not overwork the dough! It will become tough if you flex it too much). This should feel and look like pie crust dough but less fatty.
- Divide the dough in half. Roll out one half of the dough into a 1/4 to 1/3 inch thick rectangular shape about 1 inch x 1 inch. Rolling the dough too thick will make the baked Yakwa too hard. Cut the dough into 1-inch wide strips and then cut the strips at an angle to make diamond shapes or straight to make squares. It’s up to you.
- Pierce holes in the center of the cut pieces using a chopstick or fork. This will help the Yakgwa absorb the yummy syrup later on.
- Lay out the Yakwa pieces onto a pan, and brush the top of each piece generously with butter or oil.
- While the Yakgwa is baking, make the Yakgwa syrup by mixing Rice Syrup, honey, and water in a saucepan or frying pan of your choice. Put the syrup mixture on medium heat, be sure to stir occasionally so it doesn’t burn.
- Once it boils, turn the heat off before adding chopped ginger. Mix, and set it aside.
- Chop a handful (around 2 Tablespoons) of Pine Nuts for later.
- Finally, raise the temperature to 350°F (175°C) and cook for about 7-8 minutes depending on how thin your Yakwa is. The syrup should be nicely browned, but take care not to overcook it because it will end up being too dry.
- When the Yakgwa is nicely browned, take it out of the oven and immediately add it to the syrup.
- Let the Yakgwa sit in syrup for at least 30 minutes or an hour or more. You can even leave it in syrup overnight. The longer they sit in syrup, the more it will absorb and the softer it becomes. Unlike the fried yakwa where you only need to soak for a couple of minutes, baked yakwa needs to soak in syrup longer.
- Take the Yakgwa out from the syrup once it’s absorbed enough to your liking, and sprinkle chopped pine nuts on top. Enjoy!
Freezing Yakwa for storage
Yakwa will not spoil easily since it is coated with syrup and has little moisture.
You can leave it at cool room temperature for a few days, even a week but do store covered. For longer storage, you can freeze Yakwa and it will still taste fresh when defrosted.
The perfect companion for Yakwa
My husband loves having Yakwa with coffee.
I love having Yakwa with dry salami! Yes, I know my sisters call me crazy but try it if you like sweet and salty.
This is usually served as a Korean dessert but it can also be a snack. Or.. even breakfast?? No.. don’t eat it for breakfast.. 😉 you need more fresh fruit, veggies, and protein for breakfast.
Yakwa makes a great Korean dessert gift! Use mini paper liners that are usually used for chocolates and Yakwa can be boxed beautifully in gift boxes. Hope everyone has a great Mother’s Day weekend!
Be good to your Mother~ 😉
😍
❤ JinJoo